This chapter contains the following topics:
Introduction to Recurring Orders
Using Selected Recurring Orders
A recurring order is an order that is billed over and over periodically. In Order entry, recurring orders may also be used to handle blanket orders. (For a blanket order, each line item has a total quantity to be shipped and an amount remaining to be shipped.)
Use this selection to enter recurring orders and blanket orders. You can also select the recurring orders that are to be billed at a particular time and then have these orders copied to open orders. Once copied, you can select the orders for billing, print invoices and post the orders, just as if you had entered them directly using Orders (Enter).
When using a recurring order and your system is set up for PBS Multi-payment processing, it defaults the invoice (I type) to the customer’s terms. You may change it to a specific payment type in Orders (Enter). If it is an order (O type), you do not have to enter a payment or use the customer's terms until you select it for billing. For information on the configuration of this feature, see the PBS Multi-payment Setup/Credit Card appendix in the A/R user documentation.
|
Note |
The Enter option of this selection works similarly to Orders. However, credit checking is done only when a recurring order is selected to be turned into an invoice (option 3 below). If the customer is already over his credit limit, a warning message displays. However, no warning appears if selecting this recurring order would now put him over his limit. Also see Do credit checking in the Control Information chapter. |
Select Enter from the Recurring orders menu.
There are five different screens on which you enter information about a recurring order. The first two screens are for the Header, the third is the Line item screen, the fourth is the Totals screen, and the fifth is the Recurrence information screen.
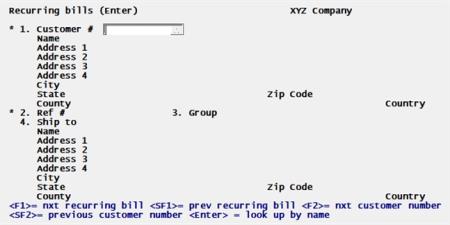
Here is the first header screen:
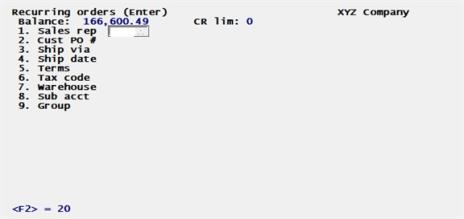
This is the second header screen:
From these screens you can work with both new and existing recurring orders and line items. If a recurring order has already been entered for the customer number and reference number you specify, it appears and is available for changes or deletion.
Recurring orders header screen 1
Enter the following information:
*1. Customer #
Options
Enter the customer number for the recurring order, or use one of the options:
|
<F1> |
To scan through the recurring orders |
|
<F2> |
To scan through the customers |
|
<Enter> |
To look up the customer by name |
|
Format |
12 characters |
2. - 11.
Field numbers 2 - 11 are the address 1-4, city, state, zip, county and country fields. The billing name and the billing address appear automatically for a regular customer.
*12. Ref #
Enter a reference number for this recurring order, or press <F1> to display the next recurring order for this customer or <SF1> for the previous recurring order for this customer.
The reference number can be used later to help locate this particular recurring order for this customer.
|
Format |
15 characters |
|
Note |
You can use the same reference number for recurring orders for different customers. |
*13. Order type
Enter the order type, either O for an O type order (two-step billing) or I for an invoice type order (one-step billing).
Press <Enter> to use the displayed type (Order) for the first order entered. For later orders, the order type defaults to the previous order type entered.
You should enter O here if the recurring order includes serialized or lot-controlled items. Entry of items with these tracking methods is not allowed on invoice type orders.
|
Format |
One character |
14. Ship to
Enter the number of the ship-to address for this customer (if you specified in O/E Control information that separate ship-to addresses are used).
Options
You may also use one of the options:
|
<F1> |
To scan through ship-to addresses for this customer (if you specified in O/E Control information that separate ship-to addresses are used) |
|
<F2> |
To enter the customer's shipping address |
|
<F8> |
To access a list of the customer's shipping address. You may select an address from the list. On the ship-to list screen there is also a button called Locations. You may click on this button to display the ship-to addresses screen where you can add, edit, delete or view ship-to addresses. |
|
<Enter> |
To use the customer's billing address as the ship-to address |
|
Format |
8 characters |
15. - 24.
Field numbers 15 - 24 are the ship-to name, address 1-4, city state, zip, county and country fields. If you pressed <Enter> or selected a ship-to address at field number 14, the ship-to name and address of the customer appear here automatically.
If you pressed <F2> at field number 14, you may enter a ship-to address for this order.
|
Format |
25 characters (first 2 lines) |
|
|
31 characters (last 2 lines) |
Recurring orders header screen 2
The fields for the second header screen start here:
1. Sales rep
Enter the sales rep for this order or press <F2> to use the sales rep entered for this customer in A/R Customers. If the ship-to address is assigned a sales rep and it is different than the customer sales rep, the <F2> defaults to the ship-to sales rep.
A sales rep cannot be entered if you specified in O/E Control information that sales reps are not used.
|
Format |
3 characters |
2. Cust PO #
If there is a customer purchase order, enter the P.O. number, or press <F2> to use the reference number as the P.O. number.
|
Format |
30 characters |
3. Ship via
This field appears only if O/E Control information specifies that ship-vias are used.
Enter a ship-via code or press <F2> to use the customer's usual ship-via code. You may also press <F8> to display a list of ship-via codes and select one from the list.
|
Format |
3 characters |
4. Ship date
The date entered here is used as the default shipping date when the shipping date is entered for each line on the next screen.
|
Format |
MMDDYY |
Options
Enter a date or use one of the options:
|
<Enter> or <F1> |
To use "ASAP: |
|
<F2> |
To have the ship date assigned at the time that the recurring order is used |
5. Terms
For a balance forward customer, the customer's usual terms code displays and changes are not allowed. For an open item customer, enter a terms code, or press <F2> to use the customer's usual terms code.
|
Format |
Three characters |
6. Tax code
The tax code entered for this order must exist in A/R Codes.
Enter a tax code or press <F2> to use the tax code entered for the ship-to address (if an address from the customer's Ship-to is being used), or to use the tax code entered for this customer in A/R Customers (if an address from the customer's Ship-to is not being used).
|
Format |
Three characters |
7. Warehouse
An entry in this field is allowed only if I/C Control information specifies that you are using multi-warehousing.
Options
Enter a warehouse or use one of the options:
|
<F5> |
To use "All" warehouses (if "All" is entered, a warehouse must be entered for each line item). |
|
Blank |
For the Central warehouse. |
|
<Enter> |
For the first order, to use the warehouse entered in O/E Control information. For subsequent orders, to use the warehouse entered for the prior order. |
|
Format |
Two characters |
Any warehouse entered must exist in I/C Warehouses.
If you enter a specific warehouse, all line items for this order must be shipped out of that warehouse. If you enter "All" for the warehouse code (by pressing <F5>), you are allowed to assign a specific warehouse to each line item, so that you can ship different line items out of different warehouses.
8. Cost center (or sub account)
This field appears only if O/E Control information specifies that multiple cost centers are used and that cost centers (or sub accounts) are not assigned by inventory item.
Enter the cost center (or sub account) to which this recurring order is assigned.
Options
You may also use one of the options:
|
<F2> |
To use the cost center specified in O/E Control information |
|
<Enter> |
For cost center 000 |
9. Group
Enter a code if you wish to assign this recurring order to a group of orders. You can use this code later to sort or print recurring orders by groups. Entering a group is optional.
|
Format |
Three characters |
Automatic Selection
Groups are also used for automatic selection of recurring orders. In automatic selection, a range of group codes is entered to select for use all recurring orders in these groups. By setting up your group codes correctly, you can greatly speed up the selection of recurring orders through the use of automatic selection. Alternatively, you may select recurring orders for use on an individual basis.
For a new recurring order
When you press <Enter> at Field number to change ?, the line item entry screen is displayed to allow you to enter the line items for the order.
For an existing recurring order
When you press <Enter> at Field number to change ?, you are asked Do you wish to change the lines ?:
| • | If you answer N, you are returned to the top of the screen to enter another recurring order. |
| • | If you answer Y, the line selection screen is displayed to allow you to make changes to the order's line items. The line selection screen is described on the Line Selection Screen section.) |
You may also press <F1> to view the recurrence information for the recurring order. The recurrence information is described on the Recurrence Information Screen section.
Finished with the Header Screens
For an existing recurring order you will be asked "Do you wish to change line items? Enter Y to go the line item entry screen or N to return to the first header screen.
For a new recurring order make any changes. When finished select the <Enter> key and the line item screen displays.
For a new recurring order, after you press <Enter> at Field number to change ? and complete the Line item screen that appears, it looks similar to this:
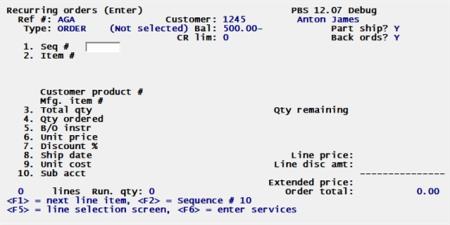
Enter the following information:
1. Seq #
Enter the sequence number for this line item.
Options
You may also use one of the options:
|
<F1> |
To scan through the existing line items |
|
<F2> |
To assign sequence #10 to the first line |
|
<F5> |
To switch to the line selection screen |
|
<F6> |
To enter services or toggle back to Enter items |
|
Format |
99999 |
If you press <F5> and line items have already been entered, the Line Selection Screen displays. Refer to the section below titled Line Selection Screen for more information.
If you use <F2> for the first line item, you can use <F2> later to assign sequence #20 for the second item, #30 to the third, and so on. This number sequence is useful if you want to insert other line items later, between two line items already entered.
The sequence number is a temporary number that determines the order in which the line items are printed. When you print the order, each line item is automatically assigned a new number in the same relative order. For example, when printed, line items with sequence numbers 10, 20, 14, 30, and 16 appear in the sequence 10, 14, 16, 20, 30, and are numbered 1, 2, 3, 4, 5.
If you want to add a line item between two other line items, assign the new line item a sequence number that falls between the other two items. For example, to insert a line item between #10 and #20, assign it a sequence number from 11 to 19.
2. Item # or Item description or Customer product #
You may find the item by the item number, item description or if used, the customer product number.
When on the Item # field enter the item number or use one of the options:
|
<F1> |
To scan through the items in I/C Items |
|
<F2> |
To look up an item by a keyword |
|
<F5> |
To enter text, rather than an item (see Entering Text below) |
|
Blank |
Select the Enter key to look up the item by its description. Then select the Enter key to look up the item by customer product number. |
|
Format |
15 characters (item #) |
|
|
25 characters (description) |
If you are entering services, you may use <F1> to scan through services.
If you look up the item by description, type in the item's description (or any portion of it beginning with the first character). The first item with a description that matches the characters you entered appears, and you are asked if this is the right item. You may press <F1> to show the next item.
If you press <F2> to look up an item by a keyword, you are then asked to enter a keyword or description (or any portion, beginning with the first letter) for the item.
Options
Enter the search information, or use one of the options:
|
<F2> |
To select a different search method |
|
<Esc> |
To return to Item # without entering search information |
The keyword search methods that are available are those that were selected in the I/C Control information selection.
After entering the search information, the first eight items that match the characters you entered are displayed, along with their categories and other pertinent information, depending on the search method.
Use the arrow keys to select an item, or enter the line number of the item.
Options
You may also use one of the options:
|
<PgDn> |
To view the next eight items that match the characters entered |
|
<PgUp> |
For subsequent pages, to view the previous eight items |
|
<Esc> |
To stop the search process without selecting an item. You may enter different search information, or press <Esc> again to return to Item #. |
After an item number is entered, you may change the description or press <Enter> to accept the description shown. Any change to the item description is for this order only. The item description in Items is unchanged.
If there is a Customer product number and description for the entered item number you may select F2 to use the customer product description 1-4.
Note that the item number of an existing line item cannot be changed on a recurring order.
Enter the customer product #. If the customer does not have an assigned customer product number for the item in the Item # field you will be asked the question: Customer product not on file. Would you like to add it? If you enter Y, the item is added. If you enter N it is not.
Serialized and Lot-controlled Items
For an I type recurring order, you may not specify an item with a tracking method of serialized or lot control. If you specify a serialized or lot-controlled item on a recurring order, the serial numbers or lot numbers can be entered only after the recurring order has been copied to Orders, using the Orders (Enter) selection.
If you press <F5> to enter text, the field Item # changes to Text and field numbers 3 - 10 clear from the screen. Up to 25 characters of text may be entered on each line, or you may enter an item number to use the Description for that item from I/C Items as your text.
Options
You may also use one of the options:
|
<F2> |
To look up an item by a keyword, in order to use its description as text (refer to the discussion of searching by keyword above) |
|
<F5> |
To switch to normal line item entry |
When entering text, each pair of text lines is automatically assigned the next available default sequence number. If you specified All warehouses on the header screen, the warehouse of the last line entered is assigned to the text lines.
After entering each pair of text lines, use Field number to change ? to correct errors in the text or to change the warehouse.
When completed entering text, press <F5> to return to the Item # field or press <Esc> to return to the Seq # field.
3. Total qty
|
Format |
99999999.99999 |
For a blanket order, enter the total quantity ordered for this item.
Options
You may also use one of the options:
|
<F1> |
For an Indefinite quantity |
|
<F2> |
To select a different selling unit, if at least one alternate unit is defined for the item |
Decimal quantities are not allowed for serialized items.
The quantity entered for field # 4 below (Qty ordered) is the qty ordered for the first release of the blanket order.
If you press <F2> to select a different selling unit, and you have previously entered Qty ordered, the quantity in that field is converted to the unit you specify here.
Qty remaining
This field is skipped if Indefinite was entered above for Total Qty.
For a new blanket order, this field is set to same value as was entered for Total qty.
For an existing blanket order, you may modify the quantity remaining on order for this line item of the blanket order.
4. Qty ordered
Options
Enter the quantity ordered for this item, or use one of the options:
|
<Enter> |
To default to a quantity ordered of 0 |
|
<F1> |
To drop ship the item directly from your vendor |
|
<F2> |
To select a different selling unit, if at least one alternate unit is defined for the item |
|
Format |
99999999.99999 |
If you press <F1> to drop ship the item, you are then asked to enter the quantity to be drop shipped. For drop shipments, the goods go directly from your supplier to your customer. The goods don't go through your inventory. The customer is billed for the items, but the quantity on-hand in your inventory is not affected.
If you press <F2> to select a different selling unit, the quantity entered for Total qty (field # 3) is automatically converted to the same unit.
Decimal quantities are not allowed for serialized items.
Fixed or var ?
If Qty ordered is not zero, enter F if the quantity is always the same for this recurring order (a fixed quantity), or enter V if it varies each time the order is selected to be used as an invoice (a variable quantity).
At the time you select this order to be turned into an invoice, you can still make changes to both fixed and recurring line item quantities. However, specifying this line item now as variable gives you an added convenience: when the order is selected later, you can press <F2> to bring up only variable line items to change.
If the Qty ordered is zero, this field is automatically displays V.
|
Format |
One character |
5. B/O instr
This field is skipped in the following situations:
| • | The item is being drop shipped. |
| • | The item is a miscellaneous item. |
| • | I/C does not use back order control (per I/C Control information). |
| • | I/C uses back order control, but the item ordered does not have back order control (per I/C Items). |
| • | If none of the above situations applies to this line item, this field allows you to give back order instructions as to how O/E is to handle this item at the time the recurring order is copied to Orders, in the event that there is insufficient quantity available to fully ship the quantity ordered for this line item. |
Enter one of the following choices:
|
1- Back order balance |
Set the quantity to ship to the quantity available for the item, and back order the balance. |
|
2 - Back order all |
Set the quantity to ship to zero and back order the entire quantity. |
|
3 - Ship in stock |
Set the quantity to ship equal to the available quantity and designate the balance of the quantity as being out of stock on the invoice. |
|
4 - Override |
Set the quantity to ship to the full quantity ordered. This results in a negative quantity available of the item. Make this selection only if you expect to receive the item into inventory prior to shipping this order. |
|
Format |
9 |
6. Unit price
Enter the unit price or press <F2> to default to the automatically calculated unit price, based on the selling unit and price code assigned to that unit.
|
Note |
Special rules apply if an item with ascending prices is assigned a price code type 7. If price-2 is higher than price-1, price-2 is not selected during price calculation. If price-3 is higher than price-2, price-3 is not selected. |
If a warehouse-specific price has been entered for the item at the current warehouse, that price is used in the calculation.
If a contract price is active (based on the system date) for this customer and this item or the item's category or sub-category, the contract price is used for the <F1> default.
If no price code is assigned to the selling unit for the item, a warehouse-specific price does not exist, and no contract price is in effect, Price-1 in Items is displayed as the <F1> default.
For items having different pricing and stocking units, the price entered will be in terms of the pricing unit assigned to this item in I/C Items. To enter the price in terms of the item's stocking unit, press <F2>, then enter the price.
|
Note |
If the unit price is zero, you are asked Are you sure ?. |
|
Format |
9999999.99999 |
7. Discount %
Enter any discount percent for this line item only. This discount is in addition to any discount that may be entered on the totals screen for the entire order. The order discount, which is taken for all lines, is calculated after the line discount is taken for each individual line.
Enter a discount percent or press <Enter> for no item discount.
|
Format |
99.999 |
8. Ship date
Options
Enter the ship date for this line item or use one of the options:
|
<F1> |
For ASAP |
|
<F2> |
To assign the date at time of use |
|
Format |
MMDDYY |
9. Unit cost
You can enter the unit cost only when entering a miscellaneous item or a drop shipped item. (The unit cost is required in these cases to keep costing analysis accurate.)
Otherwise, Rplc cost, Std cost, or Avg cost (depending on the method used) displays instead of Unit cost and changes are not allowed.
Enter the unit cost or press <F2> to use the replacement cost (LIFO method), standard cost (standard method), or average cost (average or FIFO method).
|
Format |
999999.99999 |
When initially entering the line items for a new recurring order, you may use <F5> to display the line selection screen. This screen also displays when you answer Y to Do you wish to change the lines ? on the order header screen for a previously entered order.
When asked, Do you wish to change the line items ?, you may also press <F1> to view the recurrence information for a previously entered recurring order. Recurrence information is explained in the Recurrence Information Screen section.
If you press <F5>, a screen similar to this appears:
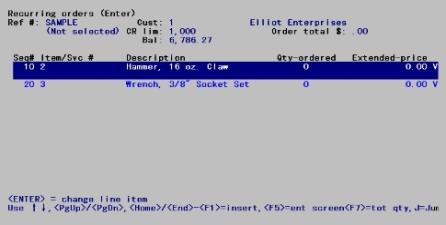
Options
When this screen is displayed, you may use these options:
|
<PgUp> |
For earlier line items |
|
<PgDn> |
For later line items |
|
Arrow keys |
To highlight a different line item (then press <Enter> to modify the line item) |
|
J |
Jump to a different line item by sequence number, item number, or item description |
|
<F1> |
Insert an item between two other line items |
|
<F5> |
Switch to line item entry screen |
|
<F7> |
Switch between viewing Qty-ordered/ Extended price information and Total qty/Qty-remaining information |
When the line item entry screen is displayed, press <F5> to switch to the line selection screen. Press <F5> again to return to the line item entry screen.
When completed entering or changing line items for the recurring order, press <Esc> at Seq # on the line item entry screen or while the line selection screen is displayed. The totals screen then appears.
When you have completed the totals screen for the recurring order, it appears similar to this:
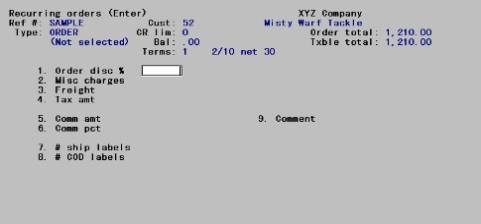
For a type O order, field numbers 2 through 6 cannot be entered or changed until the recurring order is copied to Orders and is then selected for billing, using Billing.
Enter the following information in field numbers 1, 7, and 9:
1. Order disc %
Enter the discount percentage that applies to the entire order. This percentage is applied to the total amount of the order after any discounts on individual line items are given.
Options
You may also use one of the options:
|
<F1> |
To use the customer's trade discount percentage from Customers |
|
<Enter> |
For .00 (no order discount) |
|
Format |
99.999 |
7. # ship labels
Enter the number of shipping labels to be printed.
If zero is entered for this field, shipping labels can still be printed using individual shipping label printing, which allows entry of an order number and the number of labels to be printed for the order.
|
Format |
99 |
9. Comment
Enter any comments you want to appear on the invoice. If you leave this field blank, default comments you enter in the Invoices (Print) selection will be printed on the invoice for this order.
Make any changes. For a type O order, the only fields that may be changed are 1, 7, and 9.
When you press <Enter> at Field number to change ?, the recurrence information screen is described on the Recurrence Information Screen section.
|
Format |
Five lines of 30 characters each |
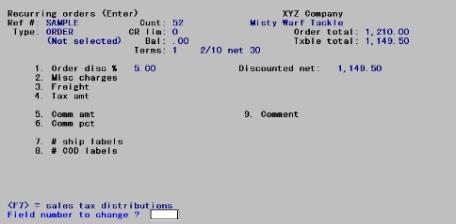
When you have completed the Totals screen for a type I recurring order, it appears similar to this:
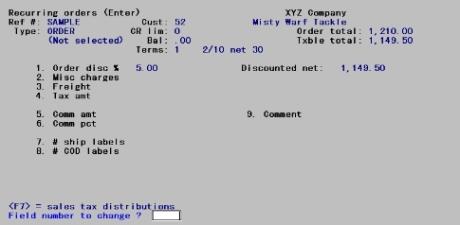
Enter the information as follows:
1. Order disc %
Enter the discount percentage to be allowed on the entire order. This order discount percentage is in addition to any line item discounts given.
|
Format |
99.999 |
2. Misc charges
Enter the amount of any miscellaneous charges for the order.
If A/R Control information specifies that miscellaneous charges are to be distributed, you are asked to enter the miscellaneous charges account number. Otherwise, the miscellaneous charges are automatically distributed to the default miscellaneous charges account specified in A/R Control information.
Enter the account number or press <F2> to use the miscellaneous charges account entered in A/R Control information.
|
Format |
99999999.99- |
3. Freight
Enter the freight charges for this order.
If A/R Control information specifies that freight charges are to be distributed, you are asked to enter the freight account number.
Enter the account number or <F2> press to use the default freight account specified in A/R Control information.
|
Format |
9999999.99- |
4. Tax amt
The sales tax amount is automatically calculated and displayed, using the tax code entered on the first screen, the taxable items on the order, the freight charges (if you answered Y to Calc sales tax on freight ? in A/R Control information), and the taxable status of miscellaneous charges.
You can use Field number to change ? to enter a different sales tax amount.
If you select to change this field, then change your mind, you can press <F1> to return to the amount that was automatically calculated.
|
Format |
99999999.99- |
Overriding the Calculated Tax
If you enter an amount different than the calculated sales tax, a window displays for you to distribute the sales tax if:
| 1. | You entered a sales tax amount that is different from the displayed calculated tax, and |
| 2. | The amount entered is not 0, and |
| 3. | The tax code that applies to this sale specifies distribution to 2 or more accounts. |
Enter the sales tax distributions as follows:
Amount
Options
Enter the amount to be distributed to the account, or use the option:
|
<F2> |
For the first tax amount, to distribute the tax according to the various percentages in the tax code for this customer. This option is only available if each tax to be distributed is based on a single percentage on an amount over $0.00. |
|
|
For the second (or third) tax amount, to distribute the entire amount remaining. |
|
Format |
999999999.99- |
5. Comm amt
If O/E Control information specifies that commissions are not used, Not applicable appears and an entry is not allowed.
The commission amount is automatically calculated and displayed, based on the commission codes for the inventory items on the order, if you specified in O/E Control information that commissions are to be used. If an item has no commission code, then the commission percentage associated with either the sales rep or customer is used to calculate the commission on the item, as per the setting in A/R Control information.
If you assign a commission code to an item with ascending prices, the commission for that item is calculated using either the commission rate associated with Price-1 (if the item sales price is price-1 or greater), or the commission rate associated with an override (if the item sales price is below price-1).
You can use Field number to change ? to enter a different commission amount.
If you change this field and later change your mind, you can press <F2> to return to the amount that was automatically calculated.
The message Comm calculated during posting is displayed if:
| 1. | The commission code for one or more of the inventory items specifies a commission based on margin (gross profit), or |
| 2. | One or more inventory items have no commission code and the commission percentage associated with the sales rep or customer (as per A/R Control information setting described above) is based on margin, and |
| 3. | Standard costing is not used by I/C. |
You can override this message by changing the commission amount using Field number to change ?.
|
Format |
99999999.99- |
6. Comm pct
If O/E Control information specifies that commissions are not used, Not applicable appears and an entry is not allowed.
The commission percent displays as .00. You can use Field number to change ? to enter an actual commission percent. The commission amount is then automatically calculated based on the discounted net.
The defaults for the commission percent and method (on price or on margin) come from one of two sources:
Customers, if you specified in A/R that commissions are calculated based on customers.
Sales Reps, if you specified in A/R that commissions are calculated based on sales reps.
If the message Comm calculated during posting is initially displayed, you may still enter a commission percentage. In this case, the percentage you enter is used to determine the commission on the order, rather than the commissions associated with the individual line items. If you specify that the commission percentage is to be based on margin, then the commission amount will be calculated during posting using the percentage that you enter here.
|
Note |
The commission percentage and method used to calculate the commission for items that do not have commission codes are based upon what is in the Customer record or Sales Rep record at the time the line item is entered in O/E. Later changes to the Customer record or Sales Rep record, or changing the sales rep for the order, do not affect the commission amounts for these line items. |
|
Format |
99.99- |
7. # ship labels
Enter the number of shipping labels to be printed.
If this field is left at zero, shipping labels can still be printed using individual shipping label printing, which allows entry of an order number and the number of labels to be printed for the order.
|
Format |
99 |
8. # COD labels
Enter the number of COD labels to be printed.
Note that the terms are displayed on the totals screen so that you can determine whether COD is relevant to the entire order, or to just the freight amount, etc.
If this field is left at zero, COD labels can still be printed using individual COD label printing, which allows entry of an order number and the number of labels to be printed for the order.
|
Format |
99 |
If you specify that one or more COD labels are to be printed, an additional field appears:
Cash only ?
Answer Y if only cash is acceptable for the COD (that is, checks are not accepted).
9. Comment
Enter any comments that you want to appear on the invoice. If you leave this field blank, any default comments you enter using Invoices are printed on the invoice.
When you are completed entering comments, press <F2>.
|
Format |
Five lines of 30 characters each |
The following shows the Recurrence Information screen:
Enter the information as follows:
1. Interval
Enter a number and then the code for the time period that indicates how frequently the recurring order is charged to the customer. The time period choices are D = days, W = weeks, or M = months.
For instance, 3 W means billed every 3 weeks.
|
Format |
Every 99 |
|
|
One character |
2. Next date
Enter the next date the recurring order is due. If an exact date is not known, you can enter an approximate date.
Options
You can also use the option:
|
<Enter> |
For the first recurring order, to use the system date. For subsequent recurring orders, to use the date entered for the prior recurring order. |
|
Format |
MMDDYY |
After you have entered this date initially, it is automatically updated for this recurring order each time it is used as an invoice.
3. Start date
Enter the date on which you want to start charging this order to the customer, or press <F2> to use the system date.
|
Format |
MMDDYY |
4. Final date
Enter the date after which you want to stop charging this order to the customer, or press <F2> for Indefinite.
|
Format |
MMDDYY |
5. Max # of times
Enter the maximum number of times you want to charge this order to the customer, or press <F2> for Indefinite.
|
Format |
999 |
You may print a list of recurring orders you have entered in order by Customer number, Customer name or by recurring order group.
You may show only orders that will be activated before a specific cut-off date and you may limit your list to show only recurring orders that are expired or recurring orders that are currently selected for use.
See a Recurring Orders List example in the Sample Reports appendix.
Select Edit list from the Recurring orders menu.
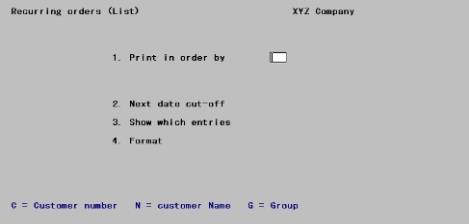
Enter the information as follows:
1. Print in order by
Enter the order in which you want the recurring orders shown on the list. Type C for customer number order, N for customer name order, or G for group order.
|
Format |
1 character |
The next two fields depend on your entry for Print in order by.
Starting (in order by entry)
Ending (in order by entry)
Enter the starting and ending in order by entries (customer number, customer name, or group). Follow the screen instructions.
2. Next date cut-off
Enter the cut-off date (next due date) of the recurring orders to be included. Recurring orders that are due to be activated as regular orders on or before this date will be shown.
Options
You may also use one of the options:
|
<Enter> |
To use the system date |
|
<F2> |
To use the Latest date (show recurring orders regardless of when they are next due) |
|
Format |
MMDDYY |
3. Show which entries
You have three choices for this field, as follows:
|
A |
All entries |
|
|
All recurring orders for the range and cut-off date above are printed. |
|
E |
Expired entries only |
|
|
Only expired entries are printed. Expired entries are those recurring orders that either: |
|
|
Have been selected more than the maximum number of times, or |
|
|
Have a final date that is before the next date (as displayed on the recurrence information screen). |
|
|
When an entry has expired, it should be reviewed for deletion from Recurring Orders. Alternatively, by resetting either the maximum number of times to be used or the final date, the recurring order can continue to be used to generate regular orders. |
|
S |
Selected entries only |
|
|
Only selected entries are printed. |
|
|
An entry is selected using Select for use as described later in this chapter. Selected entries are copied to Orders, using Use selected, which is discussed at the end of this chapter. |
|
Format |
One character |
4. Format
Enter the format in which to print the edit list, F for full format or B for brief format.
The brief format does not show cost center, warehouse, addresses, quantity back ordered, line discount percent, unit cost, scrap account, comments, or totals.
|
Format |
1 character |
5. Print recurrence info ?
Answer Y to have the recurrence information printed for each recurring order.
If you select to print a brief format list, the following field displays:
5. Blanket qty to print
Enter Q to print the quantity remaining for each recurring order on the list, or enter T to print the total quantity for each order.
|
Format |
One character |
6. Warehouse
This question appears only if you selected to multi-warehousing in I/C Control information.
Options
Enter the warehouse code for the orders you wish to print, or use one of the options:
|
<Enter> |
To print orders for the Central warehouse |
|
<F2> |
To print orders for All warehouses. (Orders that are marked All in the warehouse field are included only if you select All here.) |
|
Format |
Two characters |
Use this selection to designate which recurring orders are to be copied to Order information for invoicing.
To use the recurring order, first use Select for use to select the order to be copied. Then Use selected to copy the selected order to Orders.
You may choose automatic or manual selection.
Select Select for use from the Recurring orders menu.
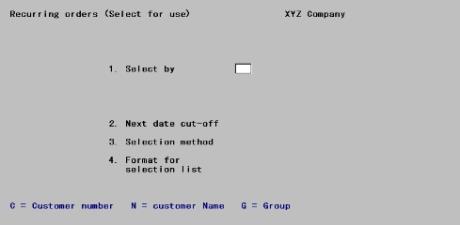
Enter the following information:
1. Select by
Specify whether to select recurring orders in order by C (Customer number), N (customer Name) or G (Group).
|
Format |
One character |
The next two fields depend on your entry for Select by.
Starting (select by entry)
Ending (select by entry)
Enter the starting and ending select by entries (customer number, customer name, or group). Follow the screen instructions.
2. Next date cut-off
If you want to select only recurring orders with a next due date on or before a specific date, enter that date here.
You may also use one of the options:
|
<F2> |
For no cut-off date |
|
<Enter> |
For the current date |
|
Format |
MMDDYY |
3. Selection method
Enter the method to use when selecting orders. Enter A for automatic selection or M for manual selection.
If you specify automatic selection, recurring orders are selected automatically based on the criteria entered above.
If you specify manual selection, recurring orders meeting the criteria above are displayed, one at a time, for you to manually select which to turn into invoices. Changes to line item information or totals can be made as an order is manually selected.
|
Format |
One character |
6. Format for selection list
This field is skipped for manual selection.
For automatic selection, a list is printed of the recurring orders that are selected automatically. Enter B to print the list in brief format or F to print the list in full format.
Recurrence information and order totals are not included on the brief format.
|
Format |
One character |
Automatic Selection
When you press <Enter> at Field number to change ?, a period of processing occurs while the recurring orders that you have specified are selected automatically by the computer. The Recurring Orders Automatic Selection Edit List will be printed to show you which recurring orders have been selected. The recurring orders that are selected will be turned into actual orders when you run Use selected (described later in this chapter).
Manual Selection
When you press <Enter> at Field Number to change ?, a screen appears for you to select recurring orders manually. Orders that are selected here will be turned into actual orders when you run Use selected.
The criteria above (cut-off date and range of customer names, customer numbers, or groups) determine which recurring orders are displayed for Recurring orders selection when you press the <F1> key. However, you can still select orders not meeting these criteria by entering the customer number and reference number on the following screen:
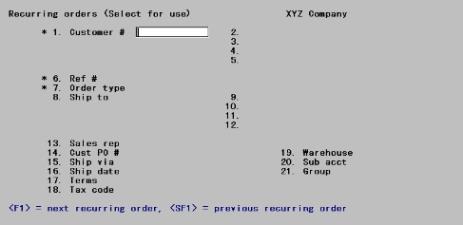
Enter the information as follows:
*1. Customer #
Enter the customer number, or press <F1> to display the next recurring order. If you enter a customer number, you will then be prompted for the Ref #. The recurring order displays.
If the order has not already been selected, you are asked whether you want to select it. If you answer N, the screen clears to enter another order to select.
If you reply that this order is to be selected, the order is selected unless:
| 1. | The Final date is earlier than the Next date. In this case, you are warned that you have gone past the final date on which this recurring order is to be sent, and asked if you wish to select it anyway. Answer Y to select it, or N to not select it. |
| 2. | The Times so far is more than the Max # of times. In this case, you are warned that you have already selected this order the maximum number of times, and asked if you wish to select it anyway. Answer Y to select it, or N to not select it. |
If the customer is already over his credit limit, a message appears informing you of this, and you are asked whether you want to continue selecting this order. Answer N to exit from selecting this order or Y to continue.
Make any changes.
The line selection screen appears to allow you to make any desired changes to the recurring order's line items, including the quantity or price of any variable or fixed line item.
You can press <Esc> to go directly to the totals screen.
After working with the first line item on an order, you may select the next line item by entering the sequence number at the Seq # field.
Options
You may also use one of these options:
|
<F1> |
For the next line item |
|
<F2> |
For the next variable line item (the next line item for which you designated the Quantity or Price as variable) |
When the right line item appears, press <Enter> to select it for changing.
|
Note |
After pressing <Enter>, you can also delete the line item from the recurring order (and thus the new regular order) by pressing F3, then answering Y to This line item will be deleted. Is this correct ?. |
At this point, you may change the quantity or price specified on the line item. If you make a change to the quantity or price, you are asked whether the field is to be fixed or variable in the recurring order. Answer F for fixed or V for variable.
Make any other changes. When no more changes to line items are desired, press <Esc> at the sequence number. The totals screen appears.
Make any changes to the totals. You may enter a cash amount if you wish.
Prior to using this selection, you should always print a list showing only the recurring orders that have been selected. Use List and choose only selected orders.
When you have verified that your selection of recurring orders is correct and complete, you are ready to copy them into actual orders. (The recurring orders still remain.)
When using a recurring order and your system is set up to use PBS Multi-payment processing, it defaults the invoice (I type) to the customer’s terms. You may change it to a specific payment type in Orders (Enter). If it is an order (O type), you do not have to enter a payment or use the customer's terms until you select it for billing. For information on the configuration of this feature, see the PBS Multi-payment Setup appendix in the A/R user documentation.
Select Use selected from the Recurring orders menu.
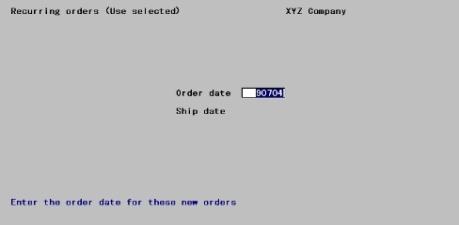
You are asked to enter the order date and ship date that are to appear on these new regular orders.
Enter the dates.
Options
You may also use one of the options:
|
<Enter> |
For the order date, to use the system date. For the ship date, to use the same date as the order date. |
|
<Esc> |
To exit without copying the orders |
You are asked, Any change ?. Answer Y and make any desired change to the date. When it is correct, answer N.
After you answer N, one order is created in Orders for each selected recurring order. Follow the screen instructions.
You can change the new orders or print a list of them using the Orders selection. You may print the invoices and post them to A/R using Invoices.
When a line item from a type O recurring order is copied into an order, it is possible that there is insufficient quantity available to fully ship the item.
If this occurs, an exception report is printed that shows each line that cannot be fully shipped. For each of these lines (as copied to Order Line Items), the quantity shipped has been set per the Back order instruction you entered for the line of the recurring order.
See a Recurring Orders Exception Report sample in the Sample Reports appendix.
When a line item from a type I recurring order is copied into an order, it is possible that there is insufficient quantity available to fully ship the item.
If this occurs, an exception report is printed that shows each line that cannot be fully shipped. For each of these lines (as copied to Order Line Items), the quantity shipped has been set to the quantity ordered. However, before printing and posting an invoice that contains a line that appears on the exception report, you should take one of the following actions:
| 1. | Obtain sufficient quantity of the item to fully ship the line and then enter a receivings in I/C for the amount received. At this point, the line can be shipped in full. |
| 2. | Use Orders to display the line item. Then change the quantity shipped so that the amount that cannot be shipped is back ordered. (Other options are also available such as shipping in stock or back ordering the entire line item until the full amount ordered is available. Refer to the Orders chapter for options information. |